Intro
The previous post left us hanging with a cliffhanger:
Being a seven-year-old product, it had accumulated some rust. In fact, AirCasting has been using the first version of Angular since inception. Unfortunately, using an outdated web framework from 2010 makes work cumbersome and slow. That translates into higher costs, many bugs and a lot of frustration.
Gladly, this last iteration was about revamping the entire user interface: the perfect excuse to introduce a new technology, cut costs and improve the product.
In fact, the post mentions the introduction of Elm but never explains the how.
Migrating from Angular v1 to Elm
The best way to rewrite any application from one technology to another is incrementally, while it continues to run. At first the new language can take over separate parts of the application and then gradually incorporate more and more code. Compared to a full blown rewrite, small increments enable:
- using the old code until it's rewritten;
- using the old logic as guidance to drive the new one;
- being able to build new features while working on the migration;
- being able to stop at any time.
That’s why the team used the following plan to migrate from Angular v1 to Elm:
- create the smallest possible proof of concept to make sure Elm is a good fit;
- embed multiple Elm applications inside Angular;
- merge the previous multiple Elm applications into one with the remaining Angular mounted on top;
- move more and more Angular to Elm when a good excuse presents itself.
The smallest possible proof of concept in Elm
Despite having experience in Elm, we didn't want to jump in the dark. Therefore, we decided to build a super tiny proof of concept. In other words, we found the smallest possible "component" that could be rewritten in Elm. Doing that we:
- learnt how to embed an Elm application into an Angular one;
- made sure the whole team was ready to commit to Elm;
- reassured ourselves that small iterations were possible.
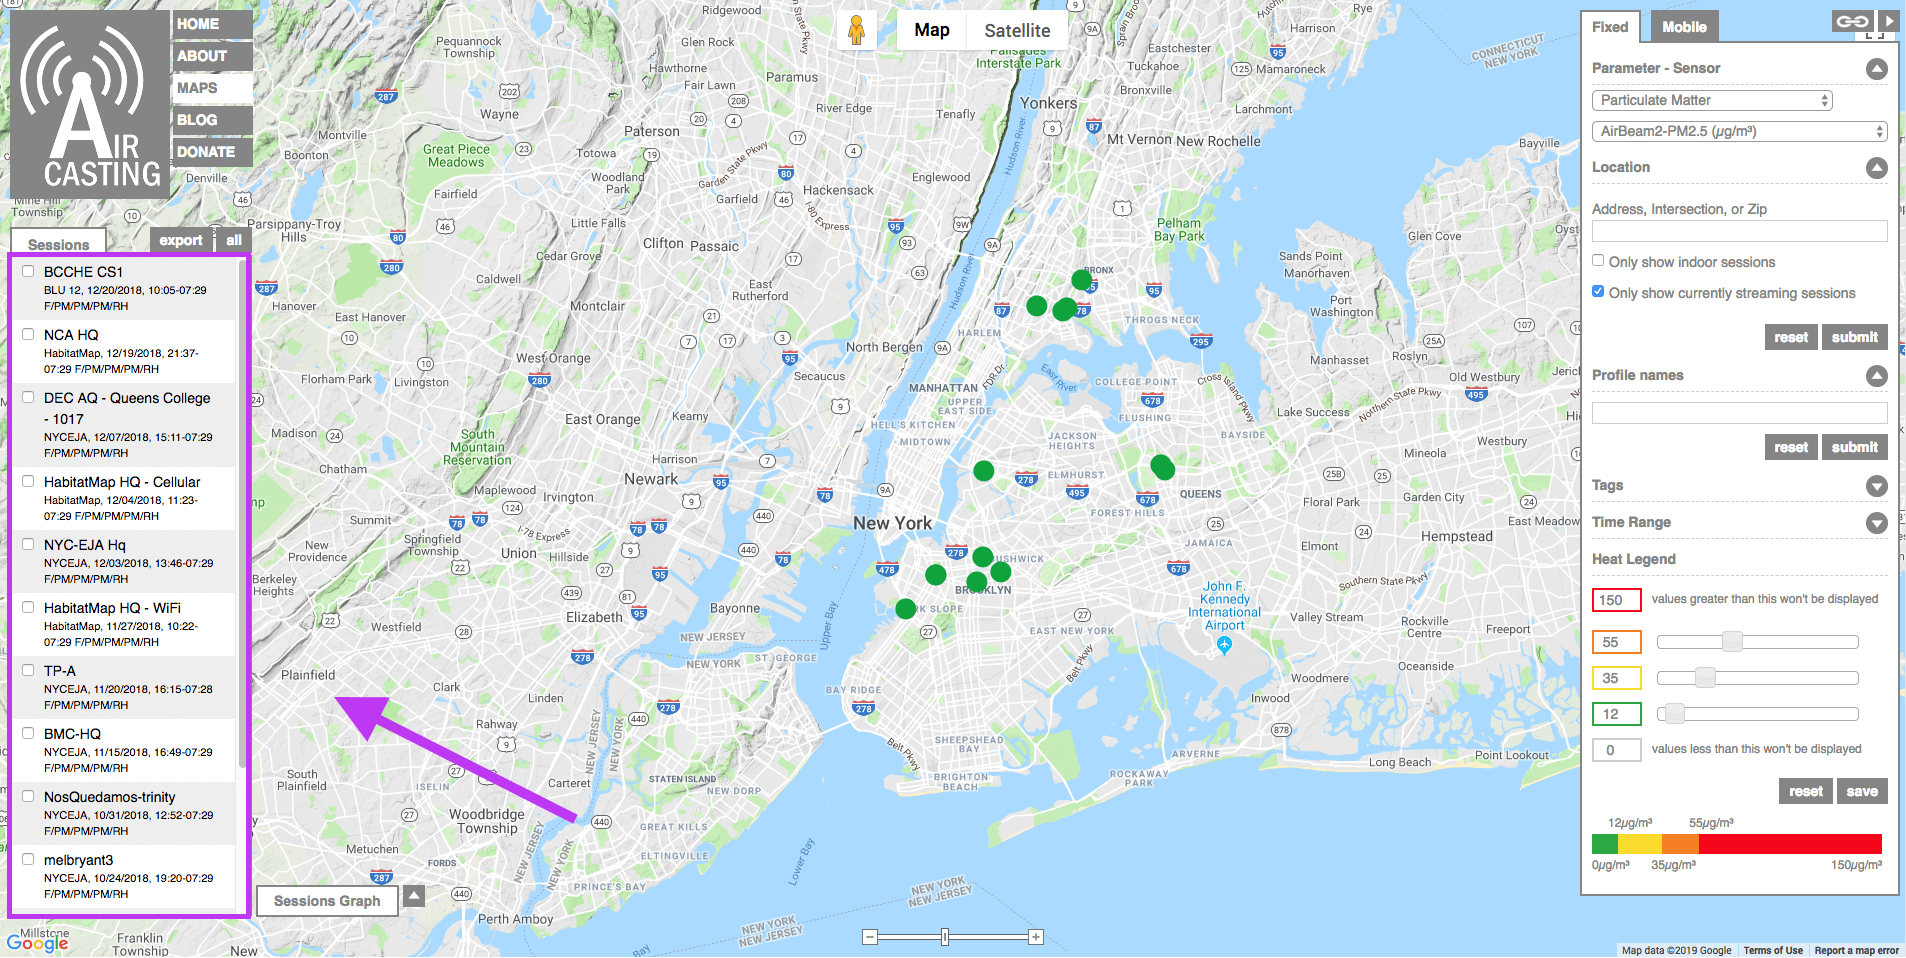
In the end, we selected the sessions list to become the first functionality to be rewritten in Elm. The sessions list is the place where the user can select which stream of health and environmental data to visualize in detail:

Commit 4cff375 is where the magic happened. In particular, we first replace the list with an empty div:
-      <ul>
-        <li ng:repeat="session in sessionsForList" ng-class="sessionCssClass(session.$selected)">
-          <input type="checkbox" collection-condition="canSelectSession(session.id)" collection="selectedSessionIds" collection-id="session.id" ng-model="session.$selected" ng-disabled="isSessionDisabled(session.id)">
-          <dl ng-click="toggleSession(session.id, false)">
-            <dt><label class="narrow">{{session.title}}</label></dt>
-            <dd>
-              <label class="narrow">
-                {{session.username}},
-                {{session.timeframe}}
-                <span ng-class="shortTypeCss(shortType.type, session.$selected)" ng-repeat="shortType in session.shortTypes">{{shortType.name}}<span ng-hide="$index==session.shortTypes.length-1">/</span></span>
-              </label>
-            </dd>
-          </dl>
-        </li>
-
-        <li ng-show = "sessionsCount === 50 || sessionsCount === 100">
-          <button ng-click="updateSessionsPage()">Load More...</button>
-        </li>
-
-      </ul>
+      <div id="sessions-bottom-elm"></div>
Then inside the Angular controller that oversees the sessions list (i.e. SessionsListCtrl) we initialize the Elm application on the empty div:
angular.element(document).ready(() => {
  const node = document.getElementById('sessions-bottom-elm');
  const flags = $scope.sessions.get().map(formatSessionForList).map(formatSessionForElm);
  elmApp = Elm.SessionsList.init({ node, flags });

  elmApp.ports.checkedSession.subscribe(({ selected, deselected }) => {
    if (deselected) $scope.toggleSession(deselected, true);
    if (selected) $scope.toggleSession(selected, true);
    $scope.$apply();
  });

  elmApp.ports.loadMoreSessions.subscribe(() => {
    $scope.updateSessionsPage();
    $scope.$apply();
  });
});
In more detail:
- the
angular.element().ready()is needed to wait for the DOM to be safe to manipulate; - the sessions are still managed by Angular, Elm just displays them; that’s why they are formatted and passed as “flags” (initial values) to the Elm application;
- since each session in Elm can be selected, we subscribe to the
checkedSessionport. That way, Elm can communicate to JavaScript that a session was selected / deselected which in turns delegates to Angular with$scope.toggleSession(); - the sessions list is paginated therefore we need to subscribe to
loadMoreSessions.
Whenever the user tweaks the search parameters, the sessions list needs to be updated with the sessions matching the new criteria. Angular listens to that by using a $watch. Therefore, we just add a line inside the callback to pass the sessions to display to Elm:
   $scope.$watch("newSessionsForList()", function(newSessions, oldSessions) {
     console.log("newSessionsForList()", newSessions, oldSessions);
     $scope.sessionsForList = newSessions;
+    if (elmApp) elmApp.ports.updateSessions.send(newSessions.map(formatSessionForElm));
   }, true);
The Elm application for the sessions list is straightforward.
That’s it! Elm is initialized by the Angular controller and via ports it communicates in and out.
Multiple Elm applications inside Angular
Elm supports compiling multiple Elm applications at once:
elm make --help

# The `make` command compiles Elm code into JS or HTML:
#
# elm make <zero-or-more-elm-files>
When using Webpack and Elm loader, it’s enough to pass an array of files in the configuration.
That is exactly what we used to inject other Elm applications inside different Angular controllers. In fact, after taking care of the sessions list, we moved to the filters:

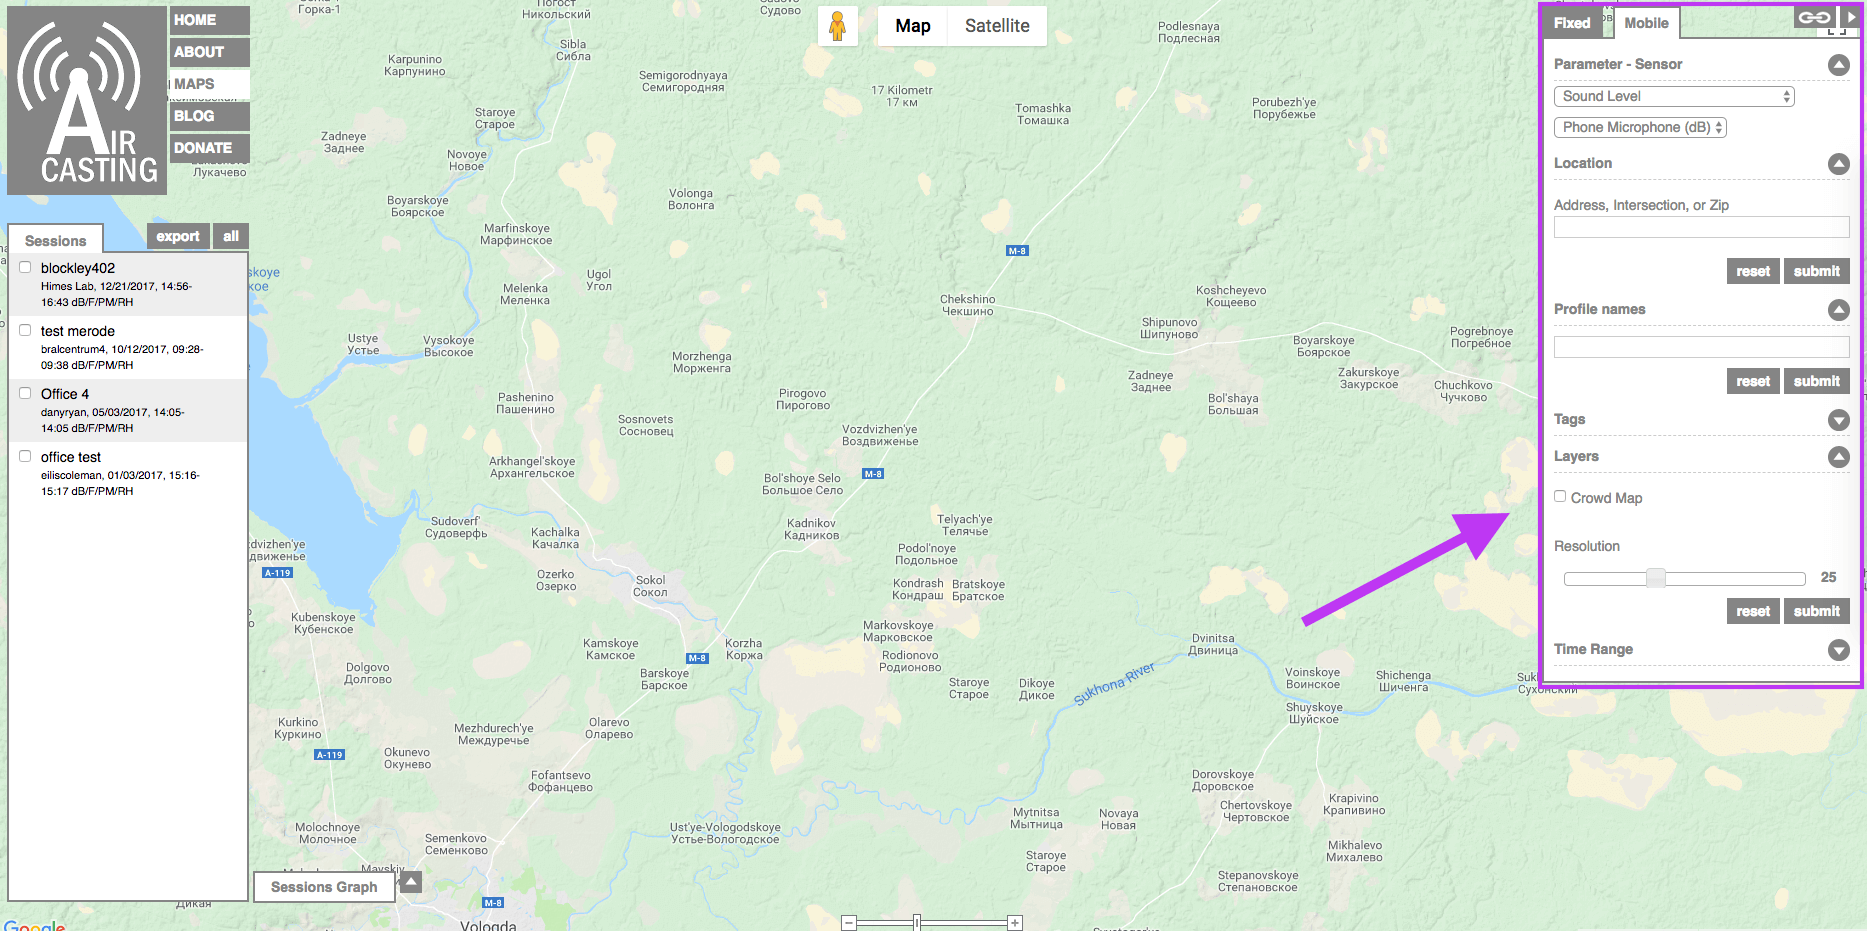
One of the first filters we moved was the Crowd Map. The feature is well described in the tooltip:
The CrowdMap averages together all the measurements from all the sessions listed on the sessions list and displays these averages as colored grid cells. The color of each grid cell corresponds to the average intensity of all the measurements recorded in that area. Click on a grid cell to view the underlying data.
The first step was to replace the Crowd Map controls with an empty div:
-          <div class="textfield">
-            <p>
-              <input type="checkbox" ng-model="storage.data.crowdMap" id="checkbox-crowd-map">
-              <label for="checkbox-crowd-map">Crowd Map</label>
-            </p>
-          </div>
-          <div>
-            <div class="slider full-slider">
-              <p>Resolution</p>
-              <div slider slider-max="maxResolution" slider-min="minResolution" slider-value="storage.data.gridResolution" slider-onslide="storageEvents.onResolutionSlide" ></div>
-              <span>{{storage.data.gridResolution}}</span>
-            </div>
-          </div>
-          <div>
-            <ul class="buttons">
-              <li><button ng-click="storage.resetCrowdMapLayer()">reset</button></li>
-              <li><button ng-click="storage.updateCrowdMapLayer()">submit</button></li>
-            </ul>
-          </div>
+          <div id="crowdMapLayer"></div>
Then inside the Angular controller that oversees the filters (i.e. MobileSessionsMapCtrl) we initialize the Elm application on the empty div
if (process.env.NODE_ENV !== "test") {
  angular.element(document).ready(function() {
    const node = document.getElementById("crowdMapLayer");

    const flags = {
      isCrowdMapOn: $scope.params.get("data").crowdMap || false,
      crowdMapResolution: $scope.params.get("data").gridResolution || 25
    };

    const elmApp = Elm.Main.init({ node: node, flags: flags });

    elmApp.ports.toggleCrowdMap.subscribe(() => {
      storage.toggleCrowdMapData();
      $scope.sessions.fetch();
    });

    elmApp.ports.updateResolutionPort.subscribe(newResolution => {
      storage.updateCrowdMapResolution(newResolution);
      sessionsUtils.updateCrowdMapLayer($scope.sessions.allSessionIds());
    });
  });
}
Whenever the checkbox to enable / disable the Crowd Map changes, the subscriber to the toggleCrowdMap port is notified. Also, whenever the slider is moved by the user, the callback registered to the updateResolutionPort port is invoked.
And again, the rest is straightforward Elm! See the commit d9c2f60 for more details.
This is the exact same strategy we employed to build the proof of concept. And the same one we repeated for other filters:
Merge Elm Applications into One
Eventually, we got to the point where the Elm applications needed to communicate among themselves. That is where we decided to go from a single Angular application with multiple Elm applications on top to a single Elm application with some Angular sprinkled on top. Commit bbb7a7c is where it all happened.
First of all, we created a JavaScript pack to initialize the single Elm application:
import { Elm } from "../elm/src/Main.elm";
import { buildAvailableParameters } from "../angular/code/services/_sensors";

document.addEventListener("DOMContentLoaded", () => {
  //...

  window.__elmApp = Elm.Main.init({ flags });
});
Notice we decided to easen the migration by putting the Elm application on the window object. That way Angular components can access the Elm ports easily. The Main.elm entrypoint contains all the Elm code that was previously scattered among multiple ones. That is clear if we take a look at the diff on the Elm loader config:
   files: [
-    resolve(__dirname, "../../../app/javascript/elm/src/MobileSessionsFilters.elm"),
-    resolve(__dirname, "../../../app/javascript/elm/src/FixedSessionFilters.elm"),
-    resolve(__dirname, "../../../app/javascript/elm/src/SessionsList.elm")
+    resolve(__dirname, "../../../app/javascript/elm/src/Main.elm"),
   ]
To initialize the Angular stuff we wait until a div with id elm-app is on the DOM:
const initAngular = () => {
  if (!document.getElementById("elm-app")) return setTimeout(initAngular, 100);

  // ... init Angular
};

initAngular();
That works because the root div rendered by Elm has exactly that id.
Migrating the remaining parts
Now that we have only one Elm application, the only thing to do is keep up the momentum. In other words, make good use of the re-writing opportunities offered by new work on the application.
